
آموزش ساخت ماشین حساب با پایتون
با عرض سلام و وقت بخیر خدمت شما کاربر عزیز
رامتین نیک آموز هستم برنامه نویس پایتون و با یک آموزش دیگه در خدمت شما کاربر عزیز هستم.
خب در این مقاله از سوین هاست ساخت ماشین حساب با پایتون به شما عشقا آموزش بدیم ؛ بکوب بریم عشق رامتین
برای ساخت این ماشین حساب از ماژول tkinter پایتون استفاده خواهیم کرد. tkinter جزو کتاب خونه های بهینه پایتون بوده و نیازی به نصب ندارد.
نکته : یعنی دیگه نمیخواد داخل ترمینال ادیتور خودتون عبارتی برای نصب کتاب خونه وارد کنید.
قبل از اینکه شروع به ساخت برنامه کنیم، بهتر است یک نمای کلی از چیزی که قرار است بسازیم، ببینیم. ماشین حسابی که انتظار داریم بعد از این آموزش داشته باشیم چیزی شبیه به این است: عکسش میزارم عشقای رامتین
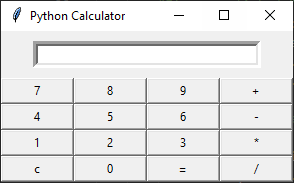
مثل اینه عشقا ؛ خب بریم سراغ ساختش ( به به )
ببینید عشقای رامتین ؛ تو این ماشین حسابی که میخوایم بسازیم اینار موردهارو داریم :
- یک صفحه برای نمایش نتیجه
- دکمههای اعداد و عملگرها
- علامت مساوی(=) و پاک کردن صفحه نتیجه(c)
مثل یک ماشین حساب دیگه ، یه چیز خیلی عالی رامتین یه چیز عالی بهتون یاد میده
ساخت پنجره اصلی ماشین حساب
در قدم اول، ماژول tkinter را از کتابخانه استاندارد پایتون import کرده و یک کلاس به همراه متد __init__ میسازیم. این کلاس بخش اصلی ماشین حساب خواهد بود که منطق برنامه در آن قرار میگیرد.
ممکن است فهمیدن کد در ابتدا مشکل باشد، اما قدم به قدم آن را توضیح میدهیم:
from tkinter import *


#Create a calculator class
class Calculator:

    #Step 2 and 3: create the first method
    def __init__(self, master):

        '''
        DOCSTRING: Define what to do on initialization
        '''

        #Step 4: Assign reference to the main window of the application
        self.master = master

        #Step 4: Add a name to our application
        master.title("Python Calculator")


#Step 5: Execution
if __name__=='__main__':

    #Step 6: Create the main window of an application
    root = Tk()

    #Step 6: Tell our calculator class to use this window
    my_gui = Calculator(root)

    #Step 6: Executable loop on the application, waits for user input
    root.mainloop()
بیایید کد بالا را قدم به قدم توضیح دهیم:
مرحله 1:
ساخت کلاس Calculator
مرحله 2:
ساخت متد __init__ . این متد پایتون به عنوان سازنده در کلاسهای پایتون عمل میکند. درست زمانی که از کلاس یک آبجکت ساخته شود، این متد فراخوانی میشود.
مرحله 3:
ارسال دو آرگومان به متد __init__ . آرگومان self که اشاره به خود آبجکت میکند و آرگومان master که پنجره اصلی ماشین حساب را مشخص میکند.
مرحله 4:
آرگومان master را در کلاس ذخیره کرده و با title عنوان پنجره ماشین حساب را تغییر میدهیم.
مرحله 5:
با استفاده از if name==main نقطه شروع برنامه را مشخص کردیم.
مرحله 6:
مشخص کردیم که در زمان اجرای فایل چه اتفاقی بیفتد. ابتدا از کلاس Tk که پنجره اصلی برنامه را میسازد، یک آبجکت ساختیم. در مرحله بعد از کلاس Calculator یک آبجکت ساخته و آبجکت root را به آن ارسال کردیم. این آبجکت به عنوان master در کلاس Calculator قرار میگیرد. در آخر با استفاده از متد mainloop به برنامه گفتیم که منتظر یک اتفاق مثل کلیک، باشد.
اضافه کردن صفحه نمایش نتیجه
در این مرحله میخواهیم صفحه نتیحه را به ماشین حساب اضافه کنیم تا بتوانیم در آن عملیاتهایی که انجام میدهیم را نمایش دهیم. این بخش ساده است و فقط باید دو خط کد به متد __init__ اضافه کنیم:
#Step 1: Create a line where we display the equation
self.equation=Entry(master, width=36, borderwidth=5)

#Step 2: Assign a position for the equation line in the grey application window
self.equation.grid(row=0, column=0, columnspan=4, padx=10, pady=10)
دلیل اینکه ما این بخش را به متد __init__ اضافه میکنیم، اینست که میخواهیم به محض اجرا شدن برنامه، این کد اجرا شود. بیایید کد بالا را توضیح دهیم:
مرحله 1:
ما صفحه نتیجه(equation) را با استفاده از Entry ایجاد میکنیم. کلاس Entry چند مقدار میگیرد. باید به کلاس Entry بگوییم که متعلق به پنجره اصلی ما یعنی master است. همچنین مقادیر عرض و ضخامت خط دور صفحه نتیجه را مشخص میکنیم.
مرحله 2:
در این بخش مشخص کردیم با استفاده از grid مشخص کردیم که صفحه نتیجه در کجای ماشین حساب باید قرار بگیرد.
تا اینجای کار کد شما باید چیزی شبیه به این باشد:
from tkinter import *


#Create a calculator class
class Calculator:

    def __init__(self, master):

        '''
        DOCSTRING: Define what to do on initialization
        '''

        #Assign reference to the main window of the application
        self.master = master

        #Add a name to our application
        master.title("Python Calculator")

        #Create a line where we display the equation
        self.equation=Entry(master, width=36, borderwidth=5)

        #Assign a position for the equation line in the grey application window
        self.equation.grid(row=0, column=0, columnspan=4, padx=10, pady=10)


#Execution
if __name__=='__main__':

    #Create the main window of an application
    root = Tk()

    #Tell our calculator class to use this window
    my_gui = Calculator(root)

    #Executable loop on the application, waits for user input
    root.mainloop()
اضافه کردن دکمه به ماشین حساب پایتونی
خب تا حالا پنجره اصلی و صفحه نتیجه را به برنامه اضافه کردیم. مرحله بعد اضافه کردن دکمه به ماشین حساب است. این خسته کننده ترین بخش کد است و از نظر فنی کمی پیشرفته تر از بخش های قبلی است. بیایید همه کدها را همراه با توضیحات مرور کنیم.
یک متد جدید به نام createButton به کد اضافه میکنیم:
# Step 1: Create a method that belongs to an instance of the Calculator class
def createButton(self):

        '''
        DOCSTRING: Method that creates the buttons
        INPUT: nothing
        OUTPUT: creates a button
        '''

        #Step 2: We first create each button one by one with the value we want
        #Using addButton() method which is described below
        b0 = self.addButton(0)
        b1 = self.addButton(1)
        b2 = self.addButton(2)
        b3 = self.addButton(3)
        b4 = self.addButton(4)
        b5 = self.addButton(5)
        b6 = self.addButton(6)
        b7 = self.addButton(7)
        b8 = self.addButton(8)
        b9 =  self.addButton(9)
        b_add = self.addButton('+')
        b_sub = self.addButton('-')
        b_mult = self.addButton('*')
        b_div = self.addButton('/')
        b_clear = self.addButton('c')
        b_equal = self.addButton('=')

        # Step 3: Arrange the buttons into lists to represent calculator rows
        row1=[b7,b8,b9,b_add]
        row2=[b4,b5,b6,b_sub]
        row3=[b1,b2,b3,b_mult]
        row4=[b_clear,b0,b_equal,b_div]

        # Step4: Assign each button to a particular location on the GUI
        r=1
        for row in [row1, row2, row3, row4]:
            c=0
            for buttn in row:
                buttn.grid(row=r, column=c, columnspan=1)
                c+=1
            r+=1
کد بالا را مرحله به مرحله توضیح میدهیم:
مرحله 1:
یک متد جدید createButton() تعریف کرده و self را به عنوان آرگومان به آن ارسال می کنیم. این self اساساً این متد را به آبجکت کلاس Calculator اختصاص می دهد.
مرحله 2:
در این مرحله آبجکتهای دکمه ها را ایجاد کردیم. از روی نام متغیر ها میتوانید متوجه کاربرد هر دکمه شوید. متد addButton را قرار است در ادامه مقاله ایجاد کنیم. این متد دکمهای که میخواهیم را با مقدار ورودی ایجاد میکند. در ادامه مقاله در رابطه با این متد بیشتر صحبت میکنیم.
مرحله 3:
در این بخش جایگاه هر دکمه را در پنجره اصلی مشخص میکنیم. چیزی که ما میخواهیم چهار ردیف چهارتایی است.
مرحله 4:
در اینجا دکمه ها را با متد gird در جایگاه مناسبشان قرار میدهیم. دقت کنید که از ردیف 1 شروع به کار کردیم چون ردیف 0 را صفحه نتیجه اشغال کرده است.
یک مرحله اضافی:
این یک مرحله مهم است و در قطعه کد بالا نیست. لازم است که از متد __init__ کلاس Calculator، متد createButton را صدا بزنید.
در این مرحله کد شما باید شبیه به این باشد:
from tkinter import *


#Create a calculator class
class Calculator:

    def __init__(self, master):

        '''
        DOCSTRING: Define what to do on initialization
        '''

        #Assign reference to the main window of the application
        self.master = master

        #Add a name to our application
        master.title("Python Calculator")

        #Create a line where we display the equation
        self.equation=Entry(master, width=36, borderwidth=5)

        #Assign a position for the equation line in the grey application window
        self.equation.grid(row=0, column=0, columnspan=4, padx=10, pady=10)

        #Execute the .creteButton() method
        self.createButton()


    def createButton(self):

        '''
        DOCSTRING: Method that creates the buttons
        INPUT: nothing
        OUTPUT: creates a button
        '''

        #We first create each button one by one with the value we want
        #Using addButton() method which is described below
        b0 = self.addButton(0)
        b1 = self.addButton(1)
        b2 = self.addButton(2)
        b3 = self.addButton(3)
        b4 = self.addButton(4)
        b5 = self.addButton(5)
        b6 = self.addButton(6)
        b7 = self.addButton(7)
        b8 = self.addButton(8)
        b9 =  self.addButton(9)
        b_add = self.addButton('+')
        b_sub = self.addButton('-')
        b_mult = self.addButton('*')
        b_div = self.addButton('/')
        b_clear = self.addButton('c')
        b_equal = self.addButton('=')

        #Arrange the buttons into lists which represent calculator rows
        row1=[b7,b8,b9,b_add]
        row2=[b4,b5,b6,b_sub]
        row3=[b1,b2,b3,b_mult]
        row4=[b_clear,b0,b_equal,b_div]

        #Assign each button to a particular location on the GUI
        r=1
        for row in [row1, row2, row3, row4]:
            c=0
            for buttn in row:
                buttn.grid(row=r, column=c, columnspan=1)
                c+=1
            r+=1


#Execution
if __name__=='__main__':

    #Create the main window of an application
    root = Tk()

    #Tell our calculator class to use this window
    my_gui = Calculator(root)

    #Executable loop on the application, waits for user input
    root.mainloop()
حالا اگر کد بالا را اجرا کنید، با یک ارور مواجه خواهید شد. دلیل این خطا اینست که از داخل متد createButton، متد addButton که وجود ندارد را صدا زدهاید. در بخش بعدی این متد را پوشش میدهیم.
اضافه کردن دکمه ها به پنجره اصلی
در این مرحله دکمههایی که ایجاد کردهایم را به ماشین حساب گرافیکی اضافه میکنیم. برای اینکار لازم است متد addButton که قبلا دیدید را ایجاد کنیم. این متد واقعا دکمهها را به برنامه اضافه میکند.
کد زیر را به کلاس Calculator اضافه کنید:
# Step 1: Create a method that belongs to an instance of the Calculator class,
# and takes the "value" of the button as the second argument.
def addButton(self,value):

        '''
        DOCSTRING: Method to process the creation of a button
        and make it clickable
        INPUT: value of the button (1,2,3,4,5,6,7,8,9,0,+,-,*,/,c,=)
        OUTPUT: returns a designed button object
        '''
        #Step 2: Create the button object
        return Button(self.master, text=value, width=9)
مرحله 1:
در مرحله اول یک متد به نام addButton ایجاد کرده و دو آرگومان self و value را به آن ارسال میکنیم. self که اشاره آبجکت کلاس میکند و value مقداری است که میخواهیم روی هر دکمه نمایش دهیم.
مرحله 2:
در اینجا از کلاس Button استفاده کرده و چند آرگومان به آن ارسال میکنیم.
self.master: آبجکت Button را به کلاس Calculator متصل میکند.
text=value: مقدار value را در دکمه نمایش میدهد.
width=9: این کد فقط برای استایل دهی است و عرض هر دکمه را برابر با 9 قرار میدهد.
اگر به درستی تمام مراحل بالا را انجام داده باشید، کدتان باید شبیه به این باشد:
from tkinter import *


#Create a calculator class
class Calculator:


    def __init__(self, master):

        '''
        DOCSTRING: Define what to do on initialization
        '''

        #Assign reference to the main window of the application
        self.master = master

        #Add a name to our application
        master.title("Python Calculator")

        #Create a line where we display the equation
        self.equation=Entry(master, width=36, borderwidth=5)

        #Assign a position for the equation line in the grey application window
        self.equation.grid(row=0, column=0, columnspan=4, padx=10, pady=10)

        #Execute the .creteButton() method
        self.createButton()


    def createButton(self):

        '''
        DOCSTRING: Method that creates the buttons
        INPUT: nothing
        OUTPUT: creates a button
        '''

        #We first create each button one by one with the value we want
        #Using addButton() method which is described below
        b0 = self.addButton(0)
        b1 = self.addButton(1)
        b2 = self.addButton(2)
        b3 = self.addButton(3)
        b4 = self.addButton(4)
        b5 = self.addButton(5)
        b6 = self.addButton(6)
        b7 = self.addButton(7)
        b8 = self.addButton(8)
        b9 =  self.addButton(9)
        b_add = self.addButton('+')
        b_sub = self.addButton('-')
        b_mult = self.addButton('*')
        b_div = self.addButton('/')
        b_clear = self.addButton('c')
        b_equal = self.addButton('=')

        #Arrange the buttons into lists which represent calculator rows
        row1=[b7,b8,b9,b_add]
        row2=[b4,b5,b6,b_sub]
        row3=[b1,b2,b3,b_mult]
        row4=[b_clear,b0,b_equal,b_div]

        #Assign each button to a particular location on the GUI
        r=1
        for row in [row1, row2, row3, row4]:
            c=0
            for buttn in row:
                buttn.grid(row=r, column=c, columnspan=1)
                c+=1
            r+=1


    def addButton(self,value):

            '''
            DOCSTRING: Method to process the creation of a button
            and make it clickable
            INPUT: value of the button (1,2,3,4,5,6,7,8,9,0,+,-,*,/,c,=)
            OUTPUT: returns a designed button object
            '''
            return Button(self.master, text=value, width=9)


#Execution
if __name__=='__main__':

    #Create the main window of an application
    root = Tk()

    #Tell our calculator class to use this window
    my_gui = Calculator(root)

    #Executable loop on the application, waits for user input
    root.mainloop()
اضافه کردن عملکرد به دکمه های ماشین حساب
بعد از مرحله قبل که گرافیک ماشین حساب پایتونی را تکمیل کردیم، نوبت آن است که عملکرد هر دکمه را مشخص کنیم.
متد زیر را به کد اضافه کنید:
# Step 1: Create a method that belongs to an instance of the Calculator class,
# and takes the "value" of the button as the second argument.
def clickButton(self, value):

        '''
        DOCSTRING: Method to program the actions that will happen
        in the calculator after a click of each button
        INPUT: value of the button (1,2,3,4,5,6,7,8,9,0,+,-,*,/,c,=)
        OUTPUT: what action will be performed when a particular button is clicked
        '''

        #Step 2: Get the equation that's entered by the user
        current_equation=str(self.equation.get())

        #Step 3: If user clicked "c", then clear the screen
        if value == 'c':
            self.equation.delete(-1, END)

        #Step 4: If user clicked "=", then compute the answer and display it
        elif value == '=':
            answer = str(eval(current_equation))
            self.equation.delete(-1, END)
            self.equation.insert(0, answer)

        #Step 5: If user clicked any other button, then add it to the equation line
        else:
            self.equation.delete(0, END)
            self.equation.insert(0, current_equation+value)
در این مرحله ما عملیاتهای ریاضی را انجام میدهیم. بیایید کد بالا را مرحله به مرحله توضیح دهیم:
مرحله 1:
یک متد به نام clickButton ساخته و دو مقدار self و value را به آن میدهیم. value مقداری است که روی دکمه وجود دارد.
مرحله 2:
برای اینکه برنامه بفهمد که چه عملیاتی را انجام دهد لازم است از مقداری که در صفحه نتیجه وجود دارد باخبر شود. برای اینکار میتوانیم از متد get استفاده کنیم.
مرحله 3:
در اینجا شروع به اضافه کردن عملیات به دکمههای میکنیم. سادهترین کاری که انجام میدهیم دکمه c است که کاربر با زدن آن صفحه نتیجه پاک میشود.
مرحله 4:
در این مرحله بررسی میکنیم که اگر کاربر روی علامت = کلیک کرد، محاسبه را انجام دهد. برای انجام محاسبه از متد eval استفاده میکنیم.
مرحله 5:
در بلاک else بررسی میکنیم که اگر کاربر روی دکمهای غیر از = کلیک کرد، مقدار این دکمه به صفحه نتیجه اضافه شود.
یک مرحله اضافی:
در مرحله آخر، باید به هر دکمه بفهمانیم که در صورت کلیک روی آنها چه عملیاتی باید انجام شود. برای اینکار باید کد زیر را:
return Button(self.master, text=value, width=9)
به کد زیر تغییر دهید:
return Button(self.master, text=value, width=9, command = lambda: self.clickButton(str(value)))
حالا هر دکمه میداند که چه عملیاتی باید انجام دهد.
اگر تمام مراحل بالا را انجام دهید، کدتان باید شبیه این باشد:
from tkinter import *


#Create a calculator class
class Calculator:


    def __init__(self, master):

        '''
        DOCSTRING: Define what to do on initialization
        '''

        #Assign reference to the main window of the application
        self.master = master

        #Add a name to our application
        master.title("Python Calculator")

        #Create a line where we display the equation
        self.equation=Entry(master, width=36, borderwidth=5)

        #Assign a position for the equation line in the grey application window
        self.equation.grid(row=0, column=0, columnspan=4, padx=10, pady=10)

        #Execute the .creteButton() method
        self.createButton()


    def createButton(self):

        '''
        DOCSTRING: Method that creates the buttons
        INPUT: nothing
        OUTPUT: creates a button
        '''

        #We first create each button one by one with the value we want
        #Using addButton() method which is described below
        b0 = self.addButton(0)
        b1 = self.addButton(1)
        b2 = self.addButton(2)
        b3 = self.addButton(3)
        b4 = self.addButton(4)
        b5 = self.addButton(5)
        b6 = self.addButton(6)
        b7 = self.addButton(7)
        b8 = self.addButton(8)
        b9 =  self.addButton(9)
        b_add = self.addButton('+')
        b_sub = self.addButton('-')
        b_mult = self.addButton('*')
        b_div = self.addButton('/')
        b_clear = self.addButton('c')
        b_equal = self.addButton('=')

        #Arrange the buttons into lists which represent calculator rows
        row1=[b7,b8,b9,b_add]
        row2=[b4,b5,b6,b_sub]
        row3=[b1,b2,b3,b_mult]
        row4=[b_clear,b0,b_equal,b_div]

        #Assign each button to a particular location on the GUI
        r=1
        for row in [row1, row2, row3, row4]:
            c=0
            for buttn in row:
                buttn.grid(row=r, column=c, columnspan=1)
                c+=1
            r+=1


    def addButton(self,value):

            '''
            DOCSTRING: Method to process the creation of a button and make it clickable
            INPUT: value of the button (1,2,3,4,5,6,7,8,9,0,+,-,*,/,c,=)
            OUTPUT: returns a designed button object
            '''
            return Button(self.master, text=value, width=9, command = lambda: self.clickButton(str(value)))


    def clickButton(self, value):

        '''
        DOCSTRING: Method to program the actions that will happen in the calculator after a click of each button
        INPUT: value of the button (1,2,3,4,5,6,7,8,9,0,+,-,*,/,c,=)
        OUTPUT: what action will be performed when a particular button is clicked
        '''

        #Get the equation that's entered by the user
        current_equation=str(self.equation.get())

        #If user clicked "c", then clear the screen
        if value == 'c':
            self.equation.delete(-1, END)

        #If user clicked "=", then compute the answer and display it
        elif value == '=':
            answer = str(eval(current_equation))
            self.equation.delete(-1, END)
            self.equation.insert(0, answer)

        #If user clicked any other button, then add it to the equation line
        else:
            self.equation.delete(0, END)
            self.equation.insert(-1, current_equation+value)


#Execution
if __name__=='__main__':

    #Create the main window of an application
    root = Tk()

    #Tell our calculator class to use this window
    my_gui = Calculator(root)

    #Executable loop on the application, waits for user input
    root.mainloop() و تمامممممممم عشقای رامتین موفق شدیم ، فقط یه نکته بگم : از ادیتور VScode استفاده کنید مهم نیستا ولی VScode کامل تره
خب عشقای رامتین ؛ نفسای رامتین
خیلی ممنونم که وقت طلاییتون را در اختیار این مطلب و سایت قرار دادین بوس بهتون
حتما مارو به دوستان خود معرفی کنید.
اگه دوست داشتید یه نگاهی به لیست قیمت هاست هامون بندازید چون واقعا عالین { سرعت بالا ، قیمت پایین }


